

How to Connect Indoor and Outdoor Units in 5 Easy Steps
Learn how the indoor and outdoor units are connected in 5 easy steps for reliable Pittsburgh mini-split performance.
How the Indoor and Outdoor Units Are Connected in a Split System
Understanding how the indoor and outdoor units are connected is the first step to knowing whether your home's HVAC system is set up correctly. Here's a quick breakdown:
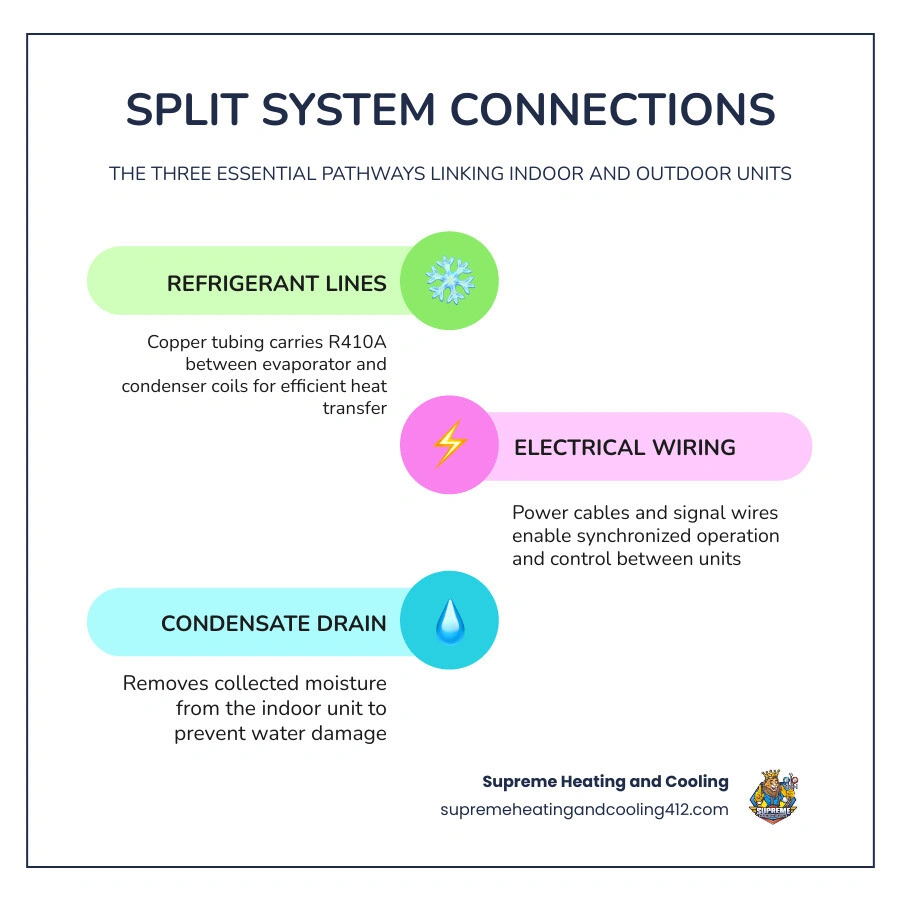
The indoor and outdoor units are connected through three main pathways:
1. Refrigerant lines - Copper tubing that carries refrigerant between the indoor evaporator coil and the outdoor condenser coil to transfer heat
2. Electrical and communication wiring - Power cables and signal wires that allow the two units to operate together and share control data
3. Condensate drain line - A pipe that removes moisture collected by the indoor unit during the cooling process
All three connections run through a single opening in the wall, bundled together in a protective conduit or line hide.
Most homeowners in the Pittsburgh, PA area don't think about what's happening inside those lines until something goes wrong. But the connection between your indoor air handler and your outdoor condenser is the heart of your split system. Get it right, and your home stays comfortable year-round. Get it wrong, and you're looking at poor efficiency, refrigerant leaks, or system failure.
Whether you're installing a new ductless mini-split or trying to understand your existing setup, knowing how these connections work puts you in control.
Understanding How the Indoor and Outdoor Units Are Connected
When we talk about split systems, we are referring to a setup where the components are "split" between the inside and outside of your home. This is the most common residential HVAC configuration in North America. The indoor unit (the air handler or evaporator) and the outdoor unit (the condenser or heat pump) work in tandem to regulate your home’s temperature.
But how do they talk to each other? The physical bridge between them is often called a "line set." This bundle contains the refrigerant lines, the electrical wiring, and the condensate drain. If you're looking at a Ductless Mini Split AC Installation Complete Guide, you'll see that these components are the literal lifelines of the system.

The Role of Refrigerant in How the Indoor and Outdoor Units Are Connected
Refrigerant is the "blood" of your HVAC system. Its job is to move heat from one place to another. In the summer, the indoor evaporator coil absorbs heat from your Pittsburgh living room. The refrigerant then travels through the copper tubing to the outdoor unit. There, the condenser coil releases that heat into the outside air.
In May 2026, most modern systems use R410A or newer eco-friendly refrigerants. These chemicals are designed to change states from liquid to gas at very low temperatures, making them incredibly efficient at heat transfer. Because these lines are under high pressure, any small gap in the connection can lead to a leak, which is why proper sealing is vital. For more on keeping these systems running smoothly, check out our Ductless Heat Pump Service Ultimate Guide.
Communication and Power: How the Indoor and Outdoor Units Are Connected
It isn't enough for the units to share refrigerant; they also need to share information. This is handled by control wiring and power line signaling. The outdoor unit usually requires a dedicated high-voltage circuit, while the indoor unit often receives its power and instructions through a multi-conductor signal cable connected to the outdoor unit.
In some advanced systems, data is transmitted directly over the power lines, but most residential setups in areas like Fox Chapel or Bethel Park use a 14/4 or similar shielded cable. This communication ensures that when you turn down the thermostat, the outdoor compressor knows exactly how much power to provide. Following NEC (National Electrical Code) standards is non-negotiable here to prevent fire hazards and ensure system longevity. This is one reason why professional mini split installation is worth the investment.
5 Steps to Connecting Your Split System
Connecting these units is a precise science. It requires specialized tools and a steady hand. While we always recommend professional installation to protect your warranty, understanding the steps can help you oversee the process in your home.
• Indoor Units — Single-Split Connection: 1 Unit — Multi-Split Connection: Up to 8 Units
• Refrigerant Lines — Single-Split Connection: One pair (liquid/suction) — Multi-Split Connection: Multiple pairs or Branch Box
• Control Wiring — Single-Split Connection: Direct point-to-point — Multi-Split Connection: Complex daisy-chain or hub
• Drainage — Single-Split Connection: Single exit point — Multi-Split Connection: Multiple lines or central pump
Step 1: Mounting and Placement
First, we must choose the right "homes" for both units. The indoor unit is mounted on a sturdy bracket on an interior wall, ideally away from direct sunlight or heat sources. Outside, the condenser is placed on a level pad or a wall-mounted bracket. It needs plenty of "breathing room"—usually at least 12 to 24 inches of clearance—to ensure proper airflow. If you're in Plum, PA, ductless mini split systems are often installed on the side of the home to keep the outdoor unit away from snow drifts and debris.
Step 2: Creating the Connection Path
Once the units are positioned, we need a way to get the lines from point A to point B. We drill a hole (usually about 3 inches in diameter) through the exterior wall. To protect the home’s structure and the lines themselves, we insert a protective sleeve or conduit. This ensures that the edges of the wall don't chafe the copper or wiring over time. This step is critical for maintaining the integrity of homes in Bridgeville, PA.
Step 3: Linking Refrigerant Lines
This is the most technical part of the process. We use high-quality copper tubing, which must be cut and bent carefully to avoid kinking. We use a flaring tool to create a precise "flare" at the end of the pipe, which then connects to the brass fittings on the units. A torque wrench is used to tighten these connections to specific manufacturer settings—too loose and it leaks; too tight and you crush the flare. For a deeper dive into this, see our step-by-step guide on mastering mini split setup.
Step 4: Electrical and Communication Wiring
Next, we run the electrical and signal cables through the same wall penetration. The wires are connected to terminal blocks inside both the indoor and outdoor units. Proper grounding is essential here to protect the sensitive inverter electronics from power surges. In Robinson Township, PA, we pay special attention to these connections to ensure they meet all local building codes.
Step 5: System Evacuation and Testing
Before any refrigerant is released, we must ensure the system is "tight." We perform a nitrogen pressure test to check for leaks. Then, we use a vacuum pump and a micron gauge to remove all air and moisture from the lines. Moisture is the enemy of an AC system; even a tiny drop can cause the oil to turn acidic and destroy the compressor. Once the vacuum holds, we release the refrigerant charge. This final step is what ensures a smooth and efficient installation.
Critical Installation Considerations for 2026
As we move through 2026, HVAC technology has become more sensitive and efficient. Modern SEER2 ratings (which can exceed 24) depend entirely on the quality of the connection.
One major consideration is the pipe length. While some units allow for long runs, every extra foot of copper adds resistance, which can slightly decrease efficiency. Additionally, if the outdoor unit is significantly higher than the indoor unit, we may need to install "oil traps" to ensure the compressor stays lubricated. In Bethel Park, PA, where homes vary from ranch-styles to multi-story builds, these elevation limits are a key part of our planning.
Multi-Split vs. Single-Split Connectivity
While a single-split system connects one indoor unit to one outdoor unit, multi-split systems are like a tree with many branches. One powerful outdoor condenser can support up to 8 indoor units.
In these setups, we often use a "branch box" or a multi-port manifold. This allows for individual zone control, meaning you can cool the kitchen to 68 degrees while keeping an unused guest room at 75. This is a game-changer for energy savings, as you aren't wasting power cooling rooms that nobody is using.
Safety and Maintenance for Unit Connections
Even the best installation needs a little love over time. The connections between your units are exposed to the harsh Pennsylvania seasons—from humid summers to freezing winters in Glenshaw or New Kensington.
Regular maintenance should include:
• Leak Detection: Checking flare nuts for any signs of oil, which usually indicates a refrigerant leak.
• Electrical Tightness: Ensuring vibrations haven't loosened the wire terminals.
• Drain Clearing: Making sure the condensate line isn't clogged with algae or debris, which could lead to water leakage inside your home.
For more tips, take a look at our guide on proper maintenance for ductless air conditioners.
Protecting the Line Set
The "line hide" is more than just a cosmetic cover. It protects the insulation on your refrigerant lines from UV rays and hungry squirrels. Over time, sun exposure can cause standard foam insulation to crumble, leading to energy loss and pipe corrosion. We also use vibration pads under the outdoor unit to prevent the copper lines from rubbing against the wall, which can cause "rub-through" leaks over several years of operation.
Frequently Asked Questions about Unit Connections
How far apart can the indoor and outdoor units be?
While it varies by manufacturer, most residential units allow for a "line set" length of 50 to 100 feet. However, the shorter the distance, the better the performance. If the units are very far apart, we have to add extra refrigerant to account for the volume of the pipes. In places like Emsworth, PA, we always calculate these distances precisely to ensure your system hits its rated SEER2 efficiency.
Can I connect multiple indoor units to one outdoor unit?
Absolutely! This is the core benefit of a multi-zone system. Depending on the tonnage (cooling capacity) of the outdoor unit, you can connect between 2 and 8 indoor units. This is perfect for older homes in the Pittsburgh area that don't have room for bulky ductwork but need cooling in every bedroom. You can learn more about the benefits of ductless mini splits here.
What happens if the connections are not properly insulated?
If the "suction" line (the larger copper pipe) isn't insulated, it will "sweat" just like a cold soda can on a hot day. This condensation can drip inside your walls, leading to mold or water damage. Furthermore, uninsulated lines allow heat to leak into the system from the outside air, forcing your compressor to work harder and raising your energy bills.
Conclusion
Knowing how the indoor and outdoor units are connected gives you a much clearer picture of how your home stays comfortable. From the high-pressure refrigerant flow to the smart communication signals, every part of the connection must be perfect to ensure a long-lasting, efficient system.
At Supreme Heating and Cooling, we pride ourselves on being the local experts for Pittsburgh, Monroeville, and the surrounding communities. Whether you need a brand-new installation or a check-up on your current connections, our team is here to provide trustworthy, non-pushy service that keeps your family comfortable.
Ready to experience the precision of a professional setup? Schedule your professional mini-split installation today and let us handle the technical details for you!
Other Blogs
Promotions
Take advantage of our latest promotions to save on chimney, dryer vent, and air duct cleaning—making it easier to protect your home and improve air quality at a great value.
10% off for veterans, law enforcement, and first responders


Customer Testimonials
Our customers love the noticeable difference in air quality, the professionalism of our team, and the peace of mind that comes with every thorough cleaning.


Copyright © 2025 Superior Vents. All rights reserved.
Designed & Developed by
